/
 YOU
YOU
PHPでBlueSkyのダイレクトメッセージを送信
#PHP
#API
0
0
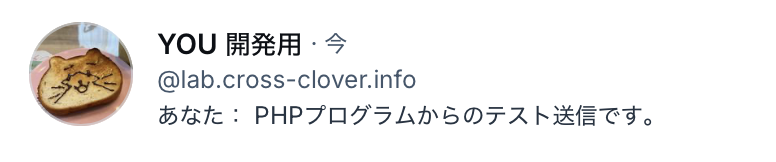
ようやくPHPでBlueSkyのDM(ダイレクトメッセージ(チャット))機能が使えました。送信先のdidを取得するまでは問題なかったのですが、DM送信のAPIへアクセスしたところでエラーが出てしまっていたのをなんとか解決したところです。
【事前準備】
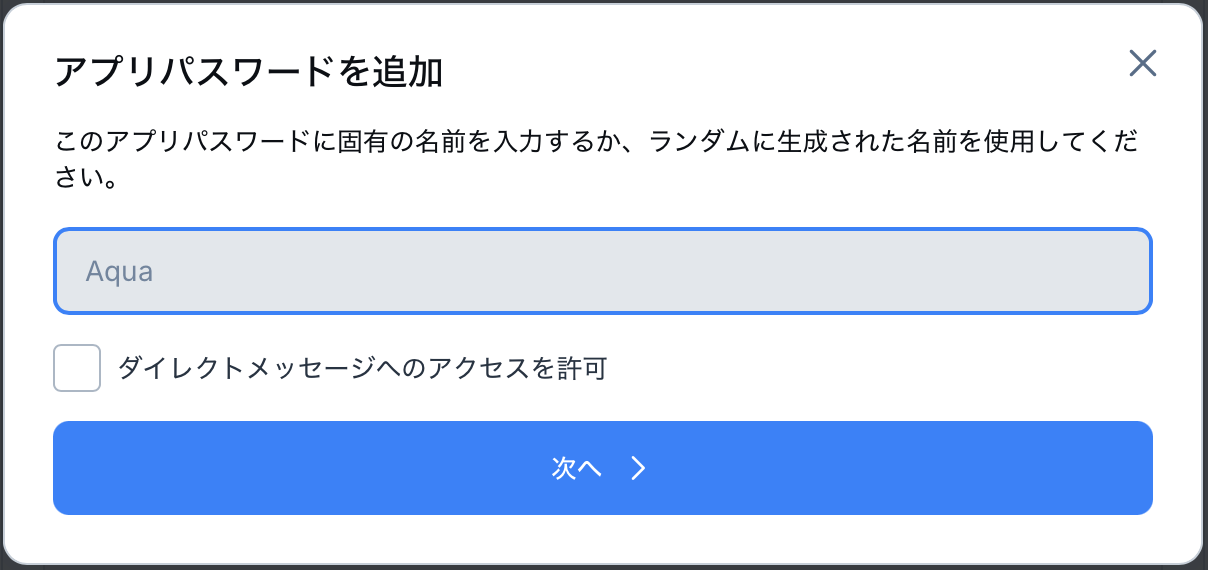
①アプリパスワードの発行時に「ダイレクトメッセージへのアクセスを許可」にチェックを入れてから作成する
②ダイレクトメッセージを送信したい相手のハンドル(@hoge.bsky.social)を確認しておく(didを把握している場合は不要)
【ログイン】
最初に作成したアプリパスワードを利用して、アクセストークンを取得します。指定のエンドポイントへPOSTするだけで簡単に取得できます。
<?php

// 自分のハンドルと、発行したアプリパスワード
$handle = 'cross-clover.info';
$appPassword = '****-****-****-****';

// パラメータの指定
$args = [
  'identifier' => $handle,
  'password' => $appPassword,
];

// ヘッダーの指定
$headers = [
  'Content-Type: application/json',
];

// エンドポイントの指定
$endPoint = 'https://bsky.social/xrpc/com.atproto.server.createSession';

// cURLを利用してPOST送信
$ch = curl_init();
curl_setopt($ch, CURLOPT_URL, $endPoint);
curl_setopt($ch, CURLOPT_HTTPHEADER, $headers);
curl_setopt($ch, CURLOPT_POST, true);
curl_setopt($ch, CURLOPT_POSTFIELDS, json_encode($args, JSON_THROW_ON_ERROR));
curl_setopt($ch, CURLOPT_HEADER, false);
curl_setopt($ch, CURLOPT_VERBOSE, false);
curl_setopt($ch, CURLOPT_RETURNTRANSFER, true);
curl_setopt($ch, CURLOPT_SSL_VERIFYPEER, false);
curl_setopt($ch, CURLOPT_SSL_VERIFYHOST, false);
curl_setopt($ch, CURLOPT_FOLLOWLOCATION, true);
$response = curl_exec($ch);

// トークンを取得
$did = $response->did;
$accessJwt = $response->accessJwt;
$refreshJwt = $response->refreshJwt;

?>
【送信対象のdidを取得】
ここからの処理は全てアクセストークンが必要です。まずは送信対象者のdidを取得します。
<?php

// パラメータの指定
$args = [
    'actor' => 'lab.cross-clover.info'  //   送信対象のハンドル
];

// ヘッダーの指定
$headers = [
    'Authorization: Bearer ' . $accessJwt,
];

// エンドポイントの指定
$endPoint = 'https://bsky.social/xrpc/app.bsky.actor.getProfile?' . http_build_query($args);

// cURLを利用してGET送信
$ch = curl_init();
curl_setopt($ch, CURLOPT_URL, $endPoint);
curl_setopt($ch, CURLOPT_HTTPHEADER, $headers);
curl_setopt($ch, CURLOPT_CUSTOMREQUEST, 'GET');
curl_setopt($ch, CURLOPT_HTTPGET, true);
curl_setopt($ch, CURLOPT_POSTFIELDS, json_encode($args, JSON_THROW_ON_ERROR));
curl_setopt($ch, CURLOPT_HEADER, false);
curl_setopt($ch, CURLOPT_VERBOSE, false);
curl_setopt($ch, CURLOPT_RETURNTRANSFER, true);
curl_setopt($ch, CURLOPT_SSL_VERIFYPEER, false);
curl_setopt($ch, CURLOPT_SSL_VERIFYHOST, false);
curl_setopt($ch, CURLOPT_FOLLOWLOCATION, true);
$response = curl_exec($ch);
$response =json_decode($response, false, 512, JSON_THROW_ON_ERROR);

// 対象ユーザのdidを取得
$target_did = $response->did;

?>
【チャットの作成】
次にチャットルームを作成します。送信対象者を指定して、チャットルームを作成しIDを取得します。ここで注意しないといけないのが、エンドポイントのドメインが今までと異なることと、ヘッダーにプロキシ情報を設定しないといけないことです。これがわからなくて詰んでました……ちゃんとドキュメントは読もうね(自戒)
<?php

// パラメータの指定
$args = [
    'members' => [$target_did],
];

// ヘッダーの指定
$headers = [
    'Authorization: Bearer ' . $accessJwt,
    'Content-Type: application/json',
    'Atproto-Proxy: did:web:api.bsky.chat#bsky_chat',   // Proxyの指定が必要
];

// エンドポイントの指定
// チャットはエンドポイントのドメインが異なる
$endPoint = 'https://api.bsky.chat/xrpc/chat.bsky.convo.getConvoForMembers?' . http_build_query($args);

// cURLを利用してGET送信
$ch = curl_init();
curl_setopt($ch, CURLOPT_URL, $endPoint);
curl_setopt($ch, CURLOPT_HTTPHEADER, $headers);
curl_setopt($ch, CURLOPT_CUSTOMREQUEST, 'GET');
curl_setopt($ch, CURLOPT_HTTPGET, true);
curl_setopt($ch, CURLOPT_HEADER, false);
curl_setopt($ch, CURLOPT_VERBOSE, false);
curl_setopt($ch, CURLOPT_RETURNTRANSFER, true);
curl_setopt($ch, CURLOPT_SSL_VERIFYPEER, false);
curl_setopt($ch, CURLOPT_SSL_VERIFYHOST, false);
curl_setopt($ch, CURLOPT_FOLLOWLOCATION, true);
$response = curl_exec($ch);
$response =json_decode($response, false, 512, JSON_THROW_ON_ERROR);

// convoIdを取得
$convoId = $response->convo->id;

?>
【メッセージの送信】
取得したチャットルームのIDに対してメッセージを送信します。ここもチャット対象なのでエンドポイントの設定に注意が必要です。
<?php

// パラメータの指定
$args = [
    'convoId' => $convoId,
    'message' => [
        'text' => 'PHPプログラムからのテスト送信ですよ。',
    ],
];

// ヘッダーの指定
$headers = [
    'Authorization: Bearer ' . $accessJwt,
    'Content-Type: application/json',
    'Atproto-Proxy: did:web:api.bsky.chat#bsky_chat',   // Proxyの指定が必要
];

// エンドポイントの指定
// チャットはエンドポイントのドメインが異なる
$endPoint = 'https://api.bsky.chat/xrpc/chat.bsky.convo.sendMessage';

// cURLを利用してPOST送信
$ch = curl_init();
curl_setopt($ch, CURLOPT_URL, $endPoint);
curl_setopt($ch, CURLOPT_HTTPHEADER, $headers);
curl_setopt($ch, CURLOPT_POST, true);
curl_setopt($ch, CURLOPT_POSTFIELDS, json_encode($args, JSON_THROW_ON_ERROR));
curl_setopt($ch, CURLOPT_HEADER, false);
curl_setopt($ch, CURLOPT_VERBOSE, false);
curl_setopt($ch, CURLOPT_RETURNTRANSFER, true);
curl_setopt($ch, CURLOPT_SSL_VERIFYPEER, false);
curl_setopt($ch, CURLOPT_SSL_VERIFYHOST, false);
curl_setopt($ch, CURLOPT_FOLLOWLOCATION, true);
$response = curl_exec($ch);
$response =json_decode($response, false, 512, JSON_THROW_ON_ERROR);

?>
これで相手に対してメッセージの送信が行えました。やってみると簡単なことなのに、なかなか動作しなくて苦労しました。ドキュメントを読める程度の英語読解力は欲しいなあ……。